27.6.16

The S1 Multiband Compressor - Pt 2

Another Example

 In part one I showed a method of using the S1 Multiband Compresssor to control the low end on a bass guitar inserting it on a single track. In the example, shown in the video below, I show multiband compression's more common use and that is during the Mastering Stage.


 In this example the multiband is used on a finished two track song inserted on the master bus. This technique was used and discussed by Gregg Wells who uses it as a way to subtely inject some dynamics into a finished two track mixdown. As he calls it "Giving it that real recording sound."

 Please take note that this is a very subtle variation. The idea is to help the track, to give your song a little pizzazz but in a very transparent way. With this being the case you really need to listen to the example on a good set of monitors or headphones. I also apologise in advance, what with the limitations of Youtube audio, that it may prove even harder to hear whats going on with the track. Nevertheless the method and idea is shown and you can most certainly try it out on your own mix's and see if you find it useful or not.

Thanks for tuning in and I do hope you find it valuable, take care and happy mixing.


24.6.16

The S1 Multiband Compressor - Pt 1

Handle With Care.

Studio One like most other Daw's comes complete with it's own multiband compressor. Now for most it's enough of an uphill challenge getting to grips with a standard compressor and it's settings, let alone throw a few more into the mix, on a multiband, and the head scratching can carry on for an eternity. Diving in with little knowledge or know-how on it's use and you can find yourself seriously messing up your once perfect mix. So lets keeps things really easy to understand and stay clear of the complexities of it's more advanced uses.


 What's the difference between a standard and a multiband compressor?

Simply put, a standard compressor is one band that effects the whole signal across the audio spectrum i.e. from 20Hz - 20Khz. Multiband, like the provided Studio One plugin, has, in this case, 5 bands. This divides the entire audio spectrum up into 5 parts/bands from low to high ,meaning you can target specific frequencies and not effect others.

Why chose a multiband over a standard compressor?

For the reason given above, you want to add compression only to a specific frequency or range of frequencies only. Now for the most part multiband is more used when mastering. This might be the case because you've run your track against a commercial song and found your low end (bass) is not on par with the commercial track. This means you can select a low band on the multi and compress the bass only and even raise it a little without effecting the rest of your mix.

 But multiband compression isn't just a one track pony either you can use it on single track instruments too and in part one of our video we'll show you a classic example.


20.6.16

Gain Staging - It's Elementry

Confused? You won't Be.

 So your best friend has a band, your client has recorded his band, and they've sent you the stems (wave audio files of every track) for you to put your, producer/mixer impresario hat on, and turn their mediocre recording into a professional (whatever that is) mix. 
 But you drag the files into a new session in Studio One (or the DAW of your choice) and when you hit the playback the main bus is clipping like crazy. Yes you've guessed it they where so busy laying down the greatest rock song ever made no-one was paying any attention to the fact that drums/bass/guitars/vocals levels where clipping (being recorded too high). So you scratch your head and think how can I fix this now, they won't/can't record it again cos they've went their separate ways.

 Gain staging is so little thought of because its too basic and unexciting we just want to bypass it and get to the good stuff like using  100's of plugins and tricking ourselves into believing we're creating the best mix ever produced. But unless we get this right at the start and maintain a vigil all the way through the mix process our mix will all be for nothing. In the analogue world we got away with the needles slamming the meter there was so much more to play with, but in the digital realm, clipping your meter is pure distortion and is nothing more than disastrous.

Gain staging can seem easy to understand, well the principles of it anyway, but so many find it hard to implement a good system of working out how best to go about it.

 Now there are two main thoughts of play as to how best to go about gain staging, using a trim plugin in,  or reducing clip gain, so the volume level is lower before it hits the faders. But I would like to throw a third method into the mix. It does involve a little expense but I feel it's honestly worth it.
 For this I will be exclusively using the most excellent, and I should add, most accurate, VU meter plugin that can be used in any DAW, the Klanghelm VUMT .

I would state that coming from the old school way of analogue recording, using a VU meter to work on, rather than the digital meters of your Daw, is more natural to me and I find it far easier to use and gain stage with.

 So without further adieu lets dig right in:-


17.6.16

VST Instruments & Studio One

A full band at your fingertips

 It wasn't so long ago that people would have laughed if you told them you could have classic synths, keyboards, piano's, drum kits and more all at your disposal, for buttons, compared to the real thing, but that's what VST (Virtual Studio Technology) Instruments have delivered to every bedroom producer. No longer do you have to have the budgets or bank accounts of a Texas Oil Baron to have your home studio packed to the gills with endless supply of top studio gear. You can have a classic Rhodes, grand piano, B3 organ, Ludwig drumkit, Les Paul guitar or a full orchestra, all for a fraction of the price featuring on endless tracks on your own compositions.

 So how do they work? Well simply put they all work off the message sent to them via midi data. This opens up a whole magical world of the ability to use loops (Pre recorded midi data) that can play piano parts or drum parts or anything else in you composition that you simply can't or don't want to play yourself. There are lots of loops incorporated in S1, dependent upon version purchased, and loads more 3rd party developers, some even for free, all offering every conceivable loop type you could want for any musical arrangement.

 Studio One comes complete with two main VST Instruments, they are Presence XT sampler and Mai Tai polyphonic analog modeling synth. Depending on the version of S1 you purchase Presence XT, in (Pro version), includes a 14 GB sound library and the ability to open EXS, Giga, and Kontakt libraries.

Throw in a small affordable usb midi controller and the world of virtual instrumentation is your oyster.
  
 In the video below we'll take a look specifically at Presence XT and a few 3rd party virtual instruments.


13.6.16

Routing Audio in Studio One

Tracks, Busses, Fx's

 Part of learning any DAW (Digital Audio Workstation) is understanding how audio is routed through it. Now some DAW's use what's called an Aux channel but Studio One does things a little differently.

 First up is the basic 'Audio track'. This is the workhorse of any DAW and where all audio is stored or recorded to. To insert a track in S1 you can go to the menu Track/Add tracks or press T on your keyboard. Here you will find yourself presented with the Track dialogue box. (see below)


  • Name: Name your track, if it's a guitar call it Guitar 1 for instance.
  • Type: The main two will be Audio or Instrument (for midi or vst instruments)
  • Count: How many tracks you want inserted.
  • Format: Mono or Stereo, mono for a single source or Stereo for multi source (i.e. two mics)
  • Preset: Here you may have created your favourite Gtr Sim/preamp/eq as a preset, this will insert all those for you on Track loadup saving you time.
  • Input: Where you have your mic or instrument plugged into your interface.
  • Output: If you want the output signal directed to your main outs or a Bus you created.
 Next up we have the 'Bus'. This special track is Stereo only in Studio One. It can be used to route or group many tracks to and then have effects applied rather than inserting effects on all separate tracks eating up valuable CPU memory. For instance you could route all your drum tracks by simply highlighting all the tracks and choosing 'Add Bus for selected tracks'. This is a very common move in mixing and audio production.
 Importantly for those used to having 'Aux' tracks, this is now your go to for that type of routing, as a bus track in S1 allows for sends which can be used to route audio to an Fx channel. Here's the two methods employed for inserting a Bus channel/track.
By right clicking on blank part of  console view.
By right clicking the mouse on a track.


Finally we have the 'Fx channel'. Now this is the channel that causes a lot of confusion especially for those porting over from other DAW's such as Pro tools. Despite what you might think an Fx channel is not similar to an Aux in Pro Tools. The Fx channel has no send feature for a start and it's primary role is to be used as an effects send. For instance say you have a snare track and wanted to add some reverb to it, you can add an Fx track and insert your reverb of choice or more efficiently from the open browser, drag your reverb of choice onto the 'send' of your snare track and hey presto, the Fx track is created automatically complete with all routing of the snare to the Fx reverb, marvellous. Check it out below.

 So why even have an Fx channel if it has no sends, what use is it? Well the difference in S1 between using a Bus for your reverb or delay sends and sending a tracks audio to an Fx channel is this, you can only 'solo safe' on an Fx channel. What is 'solo safe'? This simply means that you can solo the Fx channel and listen to the effect of any inserted plugin, i.e. reverb. This helps you better understand what effect it is having and helps you to decide how much to blend into your mix. You can't do that on a Bus. If you solo the bus then everything that is routed to it will be played back. 


So to recap 


Busing 

Buses can be extremely useful when mixing. You can route channels directly to buses to help organize a mix into common elements, such as routing all Drum Tracks directly to a drums bus. Sends are often used to route a channel to multiple buses in order to layer a signal into various elements of a mix.

 The audio output of multiple channels can be routed directly to a single Bus Channel, which is always a stereo channel. This lets you create a submix so that the audio from several channels can be processed together before being routed to the main output. Although less common, it is also possible to use sends to route audio to Bus Channels. 
For instance, several drum tracks might be routed to a Drum Bus, where the audio is compressed and equalized, and then routed to the main output. That audio could also be routed to an FX Channel, through a Send, to apply a reverb effect, which would be applied to all audio routed to that FX Channel.  


FX Channels 

Can only output to the Main Out channel of the Console, support 'solo safe' and have no send feature. 

The FX Channel is used to apply effects to audio via sends from other channels. Audio can be routed from any channel through a send to an FX Channel, which can have any number of effects inserted in its Insert Device Rack. For instance, several keyboard tracks and a guitar track could be routed via sends to an FX Channel with a reverb inserted so that they sound like they are in the same space.

There is another great new feature of S1 called 'VCA tracks' but I will devote a more in depth look at these in a later post. Have fun creating and experimenting with Audio, Instrument, Busses and Fx's tracks and their routing audio possibilities for all your mixing needs.


10.6.16

Introduction to the S1 Compressor

Automatic Level Control

 Automatic level control (ALC) was the traditional name given to compression and whilst the term is seldom used nowadays it helps give a better definition and understanding in it's title as to what compression is. Quite simply put compression operates as an automatic volume control making quieter sounds louder and louder sounds quieter to create a more even balance. Now that we know, what it is, we can better understand how to use it.

 Now Studio One comes with a very nice compressor that also incorporates some excellent advanced features as well as covering the basics too. So without further ado lets take a look.


At first it can seem a little daunting to the uninitiated but becoming familiar with some of the names on the controls and their uses,  will make everything become second nature. So lets brake down some of the terms used.
  • Ratio: How much compression is applied. For example, if the compression ratio is set for 4:1, the input level will have to cross the threshold by 4dB for the output volume level to increase by 1dB
  • Threshold: How loud the volume has to be before compression is applied.
  • Knee: Sets how the compressor reacts whenever the threshold has been crossed. For instance Hard knee settings will make the compressor grip the signal immediately whilst Soft knee will be slower to react.
  • Input Gain: Allows you to raise the audio volume level going into the compressor.
  • Gain: Or Output Gain allows you to control the volume level going out of the compressor.
  • Attack: How quickly the compressor starts working
  • Release: How soon after the volume dips below the threshold the compressor stops working.
  • Mix: How much the sound of the compressor is compared to the original
 That, admittedly, is a lot to take in and absorb but if you can memorize these names and what they do you'll find you will be able to work any compressor as they share these common controls. 
 The S1 Compressor also has some other advanced features such as (Sidechain), but we'll take a look at those and the features listed above in the video below.


9.6.16

Notice: Maintenance update 3.2.3 Now Available


Version 3.2.3 Release Notes (June 9, 2016)

New features and improvements:

• Channel input monitoring meter can now again be activated with arm button only
when Tape Style monitoring is off
• Edit Cursor is placed only when “Range Tool in upper event area” mode is activated
and clicked in upper track area
• Disabled automatic loop activation
• On stop, only locate to edit (orange) cursor when "return to start on stop" is active
• Trim whole envelope with "bracket" tool beyond last / before first point
• Show absolute and relative values in automation transform tooltip

The following issues have been fixed:

• VST Instrument timing issues with Mix Engine FX Delay Compensation
• Audio Bounce creates silent output with tape style monitoring
• Preset Issues with non-ASCII characters in file names
• Crash when importing MP3 with special tags
• The only tempo of a song can be deleted when scratch pad exists
• Crash after closing missing plugin dialog
• First part of audio missing after bounce of time-stretched event
• Quantize of grouped Audio Tracks doesn't work correctly
• Instrument events truncated on notes instead of bars
• Playing solo in layers deactivates loop
• Using smiley with heart-shaped eyes (emoticon) in file name causes song not to open

Log into your Presonus account and download the file or download the update within Studio One start page.

6.6.16

Introducing the Pro Eq

To Eq or not Eq...

 What is an Equaliser anyway? Simply put an Equaliser or, shortened to just Eq, increases or decreases the volume of a chosen frequency. It really is just like having a precise finely honed volume control that can be used to boost (increase) or cut (decrease) the volume along the audio spectrum usually from 20Hz (Low end, bass) all the way up to 20kHz (High end, treble)

When you reach for an Eq plugin or use an outboard hardware version, you need to ask yourself why you need it. There are many uses for an equaliser, when it comes to recording and mixing audio, but for the most part, there are four main applications.

 Firstly and more often than not used on everything, except a kick drum and bass guitar, we have what is called a high pass filter. This proved to be confusing to me at first. The use of the word (High) always made me think it was for using on the treble side of things, i.e. the High End. But it means that you actually cut low frequency and allow the high frequency to go untouched, hence High Pass Filter (HPF) as the highs pass through the Eq unchanged. So what does an HPF look like in Studio One? Thankfully Presonus® in their wonderful intuitive way call it LC meaning Low Cut, makes more sense to me. Have a look at the picture below.


Secondly and confusingly again we have the, Low Pass Filter (LPF). Now again the word (Low) makes one think that it's about working on the Low End (Bass) but simply it means you're cutting the High End and leaving the Low's (Bass) untouched hence Low Pass Filter. Again Presouns using some kind of advanced wisdom call it HC for High Cut. See pic below.


Thirdly we have what is called (to Cut). Remember how we learned that Equalisation is simply a precise volume control? Well 'to Cut' a frequency is to lower it's volume. In the example below I demonstrate how to search for a frequency that is unpleasant to the ear on a guitar track and show how 'to Cut' (lower it's volume) so it gives the guitar an overall better more pleasing sound.

Fourthly and finally we have the common term (to Boost). Simply meaning to raise the volume of a certain frequency. Maybe we found that a guitar sounded great at 4.5kHz for instance. then a little 'Boost' volume increase will help the guitar sound better. Watch the video below for a little more in depth use of the wonderful Pro Eq, the stock plugin, provided free with Studio One.


3.6.16

Two Ways To Record Guitar.

To Commit or Not Commit...


 There are essentially two main methods of recording using any DAW. This involves either recording directly onto an audio track, called a DI (Direct Input or Dry Signal) or secondly, through an Aux or in Studio One directly on the input channel, called a Wet Signal (As all processing, i.e. Gtr Sims, Plugins etc the sound you hear is the sound recorded. There are pros and cons to both methods but ask any Mixer/Engineer what they prefer to receive in a session sent to them and that is committing to a specific sound.

 In today's digital domain there are unlimited resources but back in the days of the analogue world there weren't so many. This meant that you had to commit. You had to, for instance, get your guitar tone how you wanted it to sound first and then you hit the record button and that was it bar a little further eq, compression, delay or reverb, but the sound from the guitar/amp was what you had started out with. The advantage of this was a song had direction, it already had a tone, whether it was a clean guitar or a dirty distorted one made the rest of the band build the song around it. This gave everyone a true insight as to how the song would turn out from the band, to the engineer, to the mixer, to the label and finally to whoever was mastering the track.

 Now leapfrog to today's digital recording. No need to worry about tape, about making a mistake, no need to commit to any sound whatsoever. This means Mixers now get sessions with several Guitar, Snare, Bass, Kick and more, tracks sent to them and they are asked to listen to them all and form something coherent from 100 plus track sessions. That's madness.
 The lack of committing offers no direction, the song/track has no soul as no-one seemed willing to say "I like that snare sound, or that guitar tone is just killer." Now there is just a chaotic, random cacoffiny of sounds and the mix/engineer is left to sort it all out, which leads to endless recalls as someone down the line decides they didn't like something.

 I laid my cards on the table, "Stop messing around, and just commit at the beginning!" there I've said it, that feels better, sometimes you've just got to get things of your chest. Believe me everyone further down the line will thank you for it.

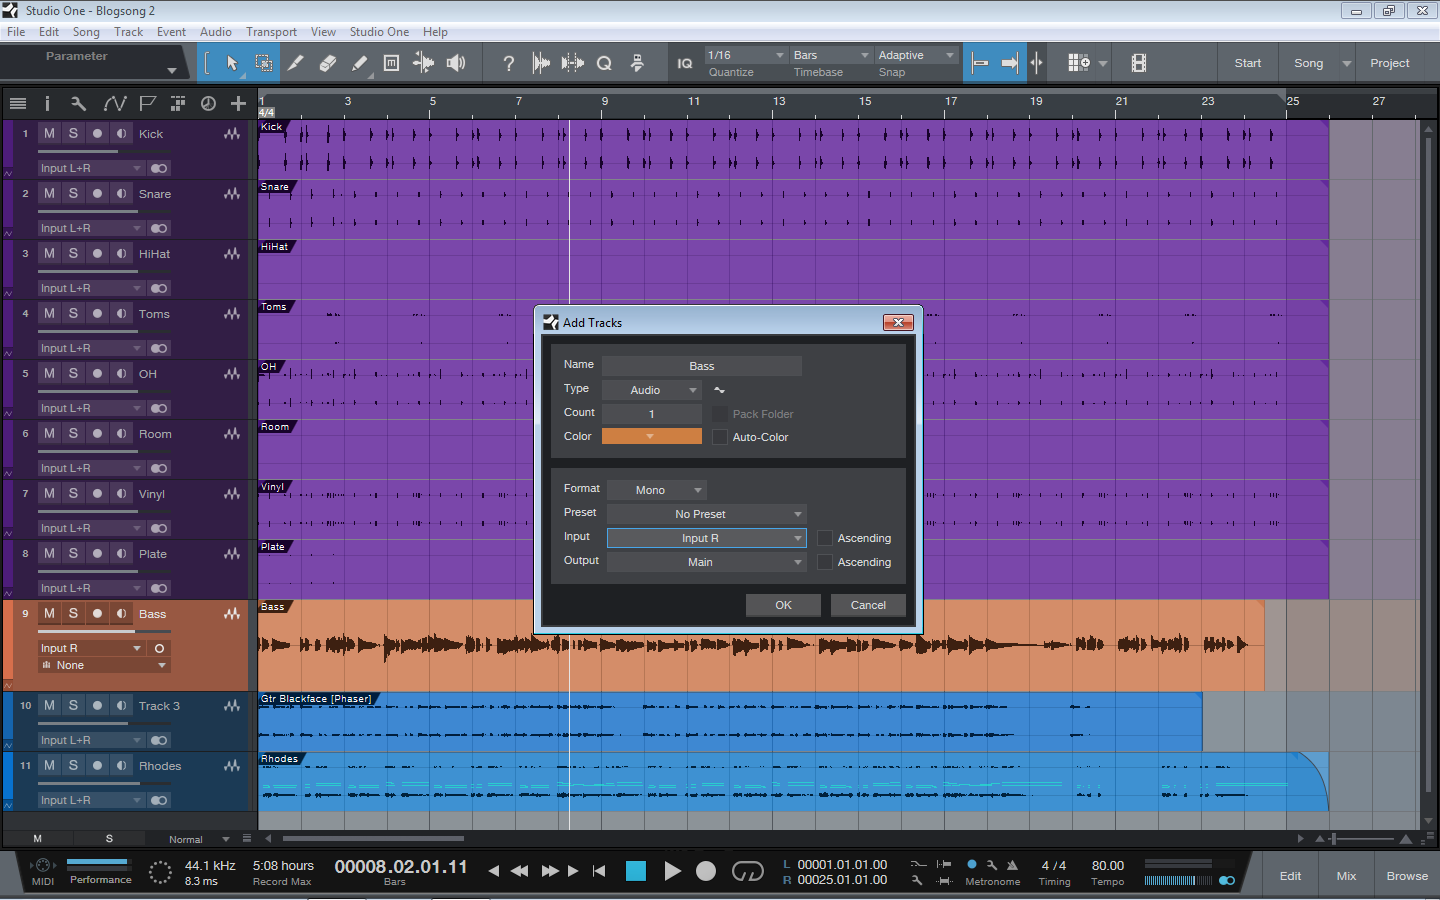
 So back to Studio One. If you really can't decide, and everyone will hate you for your indecision, only joking, then the short video below will demonstrate how to do that.
 Here I have my Audio track and I load Overloud TH2, a guitar/amp simulator, directly on the track. Now with this when you arm the track to record you will hear the sound of the TH2 sim but the dry sound (just the clean sound through your interface) is all that is actually recorded until you either, transform to audio, bounce or export and import the stem of the audio track. Implementing any of these will print to track the TH2 sound you created. This obviously means that you can change at will your simulated guitar sound forever to infinity.


 Now if you really have the backbone and commitment to put your neck on the line and say
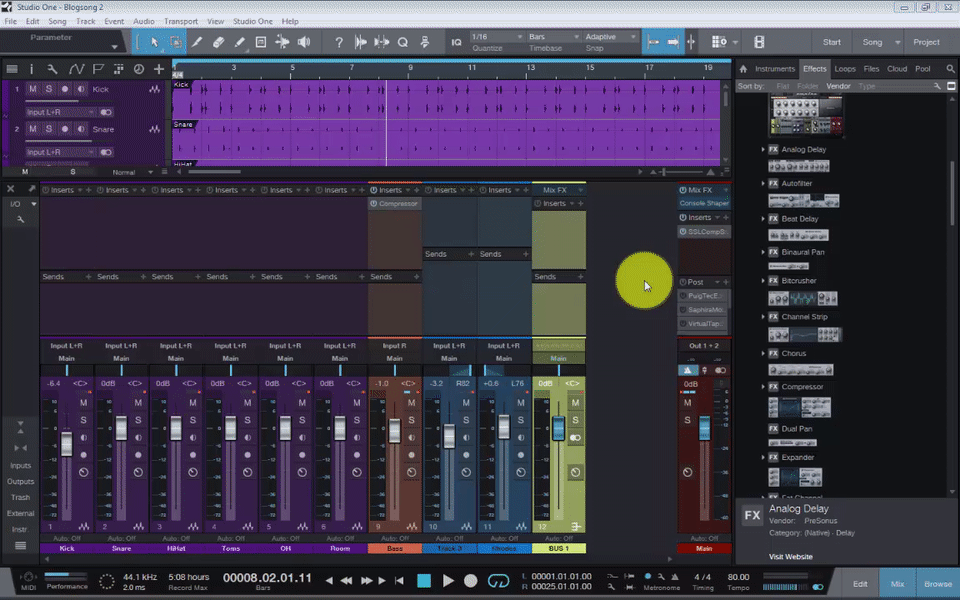
 "YES! I love that guitar tone I've just created, I'm never wanting to change from it, cos it's so freekin' awesome, and every man and his dog will be asking how did you do that? then this is how to commit the sound in Studio One by playing through the plugin on the input that your guitar is plugged into on your audio interface.


 This is an excellent feature and can be replicated in other DAW's by various methods, but implementing it in Studio One by a few mouse clicks is simply brilliant. You can really craft your sound on the way in so to speak, maybe also loading a few more plugins such as eq, compression or tape emulation, to really create that old school analogue recording technique.
 Finally the choice is yours but committing early allows you to get on with being creative rather than leaving everything to the 'Fix it in the mix' later attitude. You'll find things will flow better and faster and let you get on with the real important stuff which is.... creating music.